Displaying a QR code in MicroPython on the Tildagon Badge
By @edent![]() · emf emfcamp python QR Codes · 2 comments · 900 words · read ~434 times.
· emf emfcamp python QR Codes · 2 comments · 900 words · read ~434 times.
This was a bit of a labour of love - and something I wanted to get running during EMF Camp. I'm documenting in the hope it'll be useful for EMF 2026!
Here's the end result:
![]()
Background
I'm going to assume that you have updated your badge to the latest firmware version.
You will also need to install mpremote on your development machine.
You should also have successfully run the basic Hello, World! app.
Drawing surface
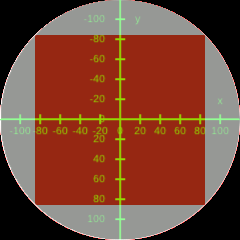
The Tildagon screen is 240x240 pixels. However, it is also a circle. This gives an internal square of 170x170 pixels. The drawing co-ordinates have 0,0 in the centre. Which means the target area is the red square as shown here:
Generate a QR code
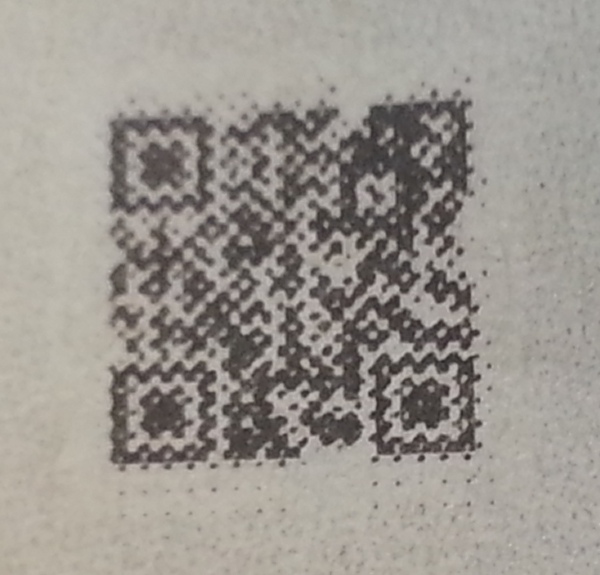
As you can see, there isn't much space here. A Version 1 QR Code is a mere 21x21 pixels. When set to "Low" error correction, it can contain up to 25 characters. A URl should start with https:// - which is 8 characters. That leaves 17 characters for the domain and path.
Use your favourite QR generator to make the tiniest QR code you can. Make sure there's no border. It should be 21x21 pixels. Here's mine:
![]()
See? Tiny!
Prepare the QR code
Next, we need to turn the QR code into a binary matrix. There may be easier ways to do this, but I used a scrap of Python:
from PIL import Image

import numpy as np


#    Load the image

image = Image.open("qr.png")


#    Convert the image to grayscale

gray_image = image.convert("L")


#    Threshold the image to get binary black and white image

threshold = 128

bw_image = gray_image.point(lambda x: 0 if x > threshold else 1, '1')


#    Convert the image to a NumPy array

pixel_array = np.array(bw_image, dtype=int)


#    Convert the array to a string with commas between the elements

array_str = np.array2string(pixel_array, separator=',', formatter={'int':lambda x: str(x)})


print(array_str)
Copy the output - we'll need it later!
Calculate size
We have a canvas of 170 pixels and a QR code of 21 pixels. 170 / 21 = 8.1 pixels. Ah. Drawing fractional pixels isn't fun. Luckily, QR codes benefit from having a safe area around them. If we make each QR pixel 7 screen pixels, that gives us (21 x 7) = 147 pixels. Which gives us enough space for a small white border.
If the QR code is to be centred, the top left corner will be in position (147 / 2) = 74. That means it will need to be drawn at position -74,-74. The top left corner is -120,-120.
So the offset used to calculate the location is (-120 + 74) = 46.
(You might be able to get away with 8 pixels and an offset of 36 pixel. Try it!)
Remember those numbers!
Write the app
This reuses a lot of the Hello World code.
import app

from app_components import TextDialog, clear_background

from events.input import Buttons, BUTTON_TYPES


class QrApp(app.App):

    #   Define the colours

    black = (  0,   0,   0)

    white = (255, 255, 255)


    def __init__(self):

        self.button_states = Buttons(self)


    def update(self, delta):

        if self.button_states.get(BUTTON_TYPES["CANCEL"]):

            self.button_states.clear()

            self.minimise()


    def draw(self, ctx):

        clear_background(ctx)


        #   QR code data (21x21 matrix)

        qr_code =[[1,1,1,1,1,1,1,0,0,1,1,0,0,0,1,1,1,1,1,1,1],

                  [1,0,0,0,0,0,1,0,1,0,1,0,0,0,1,0,0,0,0,0,1],

                  [1,0,1,1,1,0,1,0,1,1,1,1,1,0,1,0,1,1,1,0,1],

                  [1,0,1,1,1,0,1,0,0,1,1,0,0,0,1,0,1,1,1,0,1],

                  [1,0,1,1,1,0,1,0,1,1,1,1,0,0,1,0,1,1,1,0,1],

                  [1,0,0,0,0,0,1,0,1,1,0,1,0,0,1,0,0,0,0,0,1],

                  [1,1,1,1,1,1,1,0,1,0,1,0,1,0,1,1,1,1,1,1,1],

                  [0,0,0,0,0,0,0,0,1,1,1,1,1,0,0,0,0,0,0,0,0],

                  [1,1,0,1,0,0,1,1,0,0,1,0,0,0,1,1,1,0,1,1,0],

                  [1,0,1,1,1,1,0,1,1,0,0,1,1,0,1,1,1,0,0,0,1],

                  [1,0,1,0,0,1,1,1,0,1,1,0,1,0,0,0,0,0,1,0,1],

                  [1,1,1,1,0,1,0,1,0,0,0,0,0,0,1,0,1,1,0,1,1],

                  [1,0,1,0,0,1,1,1,0,0,1,1,1,0,0,1,0,1,0,0,0],

                  [0,0,0,0,0,0,0,0,1,0,0,0,1,1,0,1,0,0,0,0,1],

                  [1,1,1,1,1,1,1,0,1,0,1,0,1,1,0,0,1,1,1,1,0],

                  [1,0,0,0,0,0,1,0,0,0,0,1,1,0,0,1,1,0,0,0,0],

                  [1,0,1,1,1,0,1,0,0,0,1,1,0,1,0,0,1,1,0,1,1],

                  [1,0,1,1,1,0,1,0,1,0,0,0,1,0,1,0,1,0,0,0,1],

                  [1,0,1,1,1,0,1,0,0,0,1,1,1,0,1,0,1,0,1,0,1],

                  [1,0,0,0,0,0,1,0,1,1,1,0,0,1,0,0,0,0,0,0,0],

                  [1,1,1,1,1,1,1,0,1,0,1,0,1,0,1,0,1,0,0,1,0]]


        #   Draw background

        ctx.rgb(*self.white).rectangle(-120, -120, 240, 240).fill()


        #   Size of each QR code pixel on the canvas

        pixel_size = 7


        #   Offset size in pixels

        offset_size = 46


        #   Calculate the offset to start drawing the QR code (centre it within the available space)

        offset = -120 + offset_size


        #   Loop through the array

        for row in range(21):

            for col in range(21):

                if qr_code[row][col] == 1:

                    x = (col * pixel_size) + offset

                    y = (row * pixel_size) + offset

                    ctx.rgb(*self.black).rectangle(x, y, pixel_size, pixel_size).fill()


__app_export__ = QrApp
Installation
- Follow the instructions
- Run
mpremote cp ~/Documents/badge/* :/apps/qr/ - Restart the badge
- Scroll down the app list and launch the QR app
The non-stupid way!
OK, that was the hard way - here's the easy way.
Use the MicroPython QR Generation library uQR.
If you pop that file in your project directory, and upload it to the badge, then you can import it with:
from .uQR import QRCodeThe QR code has its own white margin and is a 2D array of True & Falses.
# QR code data (29x29 matrix)

qr = QRCode()

qr.add_data("https://edent.tel")

qr_code = qr.get_matrix()

qr_size = len( qr_code )


#   Draw background

ctx.rgb(*self.white).rectangle(-120, -120, 240, 240).fill()


#   Size of each QR code pixel on the canvas

pixel_size = int( 170 / qr_size ) + 1


#   Border size in pixels

border_size = ( 240 - (pixel_size*qr_size) ) / 2


#   Calculate the offset to start drawing the QR code (centre it within the available space)

offset = -120 + border_size


#   Loop through the array

for row in range( len(qr_code) ):

    for col in range( len(qr_code) ):

        if qr_code[row][col] == True:

            x = (col * pixel_size) + offset

            y = (row * pixel_size) + offset

            ctx.rgb(*self.black).rectangle(x, y, pixel_size, pixel_size).fill()
Next steps
- This is hardcoded for a single QR code - mine! Perhaps it should be configurable?
- Add some text to the screen?
- Animations? Colour? Flashing LEDs?
Got any thoughts? Stick them in the box!


@blog but..those swan drones will see you🤣
It wasn't my best talk (juggling lots of hardware issues with very little sleep!), but "Extending MicroPython: Using C for good!" from PyCon AU 2019 did discuss using native modules (ie written in C but loaded at runtime) with an example to generate QR codes!
I have a gist that wraps up the Project Nayuki C QR code generator. It shouldn't take too much effort to reuse this if you want a solution that performs much better than a pure MicroPython implementation and is still convenient to load/use:
https://gist.github.com/mattytrentini/09885f5aae78590e5d4cce15a18c62dc
More comments on Mastodon.