Disclaimer! Work In Progress! See source code.
I recently read this wonderful blog post about using 17th Century Dutch fonts on the web. And, because I'm an idiot, I decided to try and build something similar using Shakespeare's first folio as a template.
Now, before setting off on a journey, it is worth seeing if anyone else has tried this before. I found David Pustansky's First Folio Font. There's not much info about it, other than it's based on the 1623 folio. It's a nice font, but missing brackets and a few other pieces of punctuation. Also, no ligatures. And the long s is in the wrong place.
So, let's try to build a font!
You can read how it works, or skip straight to the demo.
Get some scans
There are various scans of the First Folio. I picked The Bodlian's scan as it seemed the highest resolution.
I plucked a couple of pages at random to see what I could find. Of course, a modern font can't replicate the vagaries of hot metal printing. As you can see here, each letter "y" is substantially different.

Within the plays, there are some italic characters - which could be used to make a variant font. You can also see just how poor quality some of the letters are.

There are also plenty of ligatures to choose from:

Ready? Let's go!
Extract the characters
This Python code reads in an image file. It then extracts every distinct letter, number, and punctuation mark. It then detects which character it is and saves each glyph to disk with a filename like this:

As you can see, the text detection is good, but the letter recognition is poor.
Python 3
import cv2 import pytesseract from PIL import Image def preprocess_image(image_path): # Load the image using OpenCV image = cv2.imread(image_path, cv2.IMREAD_GRAYSCALE) # Thresholding to convert to binary image _, binary_image = cv2.threshold(image, 128, 255, cv2.THRESH_BINARY_INV) # Find contours to isolate individual letters contours, _ = cv2.findContours(binary_image, cv2.RETR_EXTERNAL, cv2.CHAIN_APPROX_SIMPLE) return image, contours def extract_and_save_letters(image, contours, output_directory): # Create output directory if it doesn't exist import os if not os.path.exists(output_directory): os.makedirs(output_directory) for i, contour in enumerate(contours): x, y, w, h = cv2.boundingRect(contour) # Crop and save each letter as a separate image letter_image = image[y:y + h, x:x + w] # (Don't) Perform OCR to extract the text (letter) from the contour letter_text = "_" #letter_text = pytesseract.image_to_string(letter_image, config='--psm 10') #letter_text = letter_text.strip() # Remove leading/trailing whitespace # Create a filename with the detected letter letter_filename = f"letter_{letter_text}_{i}.png" letter_path = os.path.join(output_directory, letter_filename) cv2.imwrite(letter_path, letter_image) if __name__ == "__main__": input_image_path = "letters.jpg" output_directory = "/tmp/letters/" # Preprocess the image image, contours = preprocess_image(input_image_path) # Perform OCR and save individual letters extract_and_save_letters(image, contours, output_directory)
Something to note - the CHAIN_APPROX_SIMPLE is looking for contiguous characters. So it loses the dots from i, j, :, and ;. But it is quick.
Detecting Dots
In order to get glyphs which vertically separate, we need to vertically erode the image so it looks like this:

# Erode the image vertically kernel = np.array([[0, 0, 0, 0, 0], [0, 0, 1, 0, 0], [0, 0, 1, 0, 0], [0, 0, 1, 0, 0], [0, 0, 0, 0, 0]], dtype=np.uint8) erode = cv2.erode(image, kernel,iterations = 6)
We use this eroded image for contiguous detection - but we do the actual cropping on the original image.
As you can see, it does make some character touch each other - which means you get occasional crops like this:
They can either be manually split, or ignored.
Put each letter into a folder
There's no automated way to do this. It's just a lot of tedious dragging and dropping. It's hard to tell the difference between o and O, or commas and apostrophes.
Ideally we want several of each glyph because we're about to...
Find the average letterform
Here's a selection of letter "e" images which were extracted.

I didn't want to make some rather arbitrary decisions on which letters I like best. So I cheated.
I copied all the letter "e"s into a folder. I used Python to create the average letter based on the two-dozen or so that I'd extracted. This code takes all the images in a directory, and spits out a 1bpp average letter - like this:

import os import numpy as np import argparse import math from PIL import Image def get_arguments(): ap = argparse.ArgumentParser() ap.add_argument('-l', '--letter', type=str, help='The letter you want to average') arguments = vars(ap.parse_args()) return arguments def load_and_resize_images_from_directory(directory, target_size): image_files = [f for f in os.listdir(directory) if f.endswith(".png")] images = [] for image_file in image_files: image_path = os.path.join(directory, image_file) print("Reading " + image_path) image = Image.open(image_path).convert("L") # Convert to grayscale # Create a new white background image new_size = (target_size[0], target_size[1]) new_image = Image.new("L", new_size, color=255) # White background old_width, old_height = image.size # Center the image x1 = int(math.floor((target_size[0] - old_width) / 2)) y1 = int(math.floor((target_size[1] - old_height) / 2)) # Paste the image at the center new_image.paste(image, (x1, y1, x1 + old_width, y1 + old_height)) # Make it larger to see if that improves the curve detection new_image = new_image.resize( (600,600), Image.LANCZOS) images.append(new_image) return images def calculate_average_image(images): # Convert the list of images to numpy arrays images_array = [np.array(img) for img in images] # Calculate the average image along the first axis average_image = np.mean(images_array, axis=0) return average_image def convert_to_1bpp(average_image, threshold=120): # Convert the average image to 1bpp by setting a threshold value binary_image = np.where(average_image >= threshold, 255, 0).astype(np.uint8) return binary_image def save_1bpp_image(binary_image, output_path): # Convert the numpy array to a binary image binary_image = Image.fromarray(binary_image, mode="L") # Save the 1bpp monochrome image to the specified output path binary_image.save(output_path) if __name__ == "__main__": args = get_arguments() letter = args['letter'] input_directory = "../letters/" + letter + "/" output_png_path = "../letters/" + letter + ".png" target_size = (75, 75) # Set the desired target size for resizing # Load, resize, and add border to all images from the directory images = load_and_resize_images_from_directory(input_directory, target_size) # Calculate the average image average_image = calculate_average_image(images) # Convert the average image to 1bpp binary_image = convert_to_1bpp(average_image) # Save the 1bpp monochrome image save_1bpp_image(binary_image, output_png_path)
One Big Image
The next step is to create a single image which holds all of the glyphs. Our good friend ImageMagick comes to the rescue here:
montage *.png -tile 12x8 -geometry +10+10 all_glyphs.png
That takes all of the average symbol .png files and places them on a single image. It looks like this:

Trace Those Glyphs
The GlyphTracer App will take the image and generates a Spline Font Database. It isn't the most intuitive app to use. But after a bit of clicking around you can work out how to assign each image to a glyph.

GlyphTracer uses potrace which turns those raggedy rasters into smoothly curved paths.
Once done, we're on to the next step.
Forge Those Fonts!
The venerable FontForge will open the SFD and show us what the proto-font looks like:
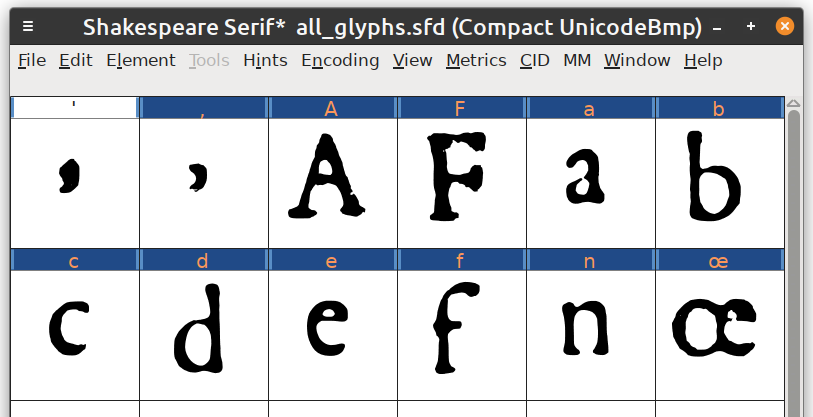
As you can see, all the letters have been vertically centred. So double tap and edit their position - you can also adjust the curves if you like:

The final result looks something like this:

FontForge's "File" ➡ "Generate Font" will let you save the output as TTF, WOFF2, or anything else you want.
Demo!
Here's what the font looks like when rendered on the web:
Two houſeholds, both alike in dignity!
Alas poor Yorik; I knew him Horatio.
To be? Or not to be? That's the uestion.
Bump sickly, vexing wizard! Be sly, fox, and charm the dragon's breath.
TODO
- Get more sample images from the 1st Folio.
- Extract more letters, numbers, ligatures, and symbols.
- Sort symbols into sub-directories.
- Generate font with complete alphabet.
- Tidy up curves.
- Set correct height, ascenders, descenders, etc.
- Make the ligatures automatic.
- Other font stuff that I haven't even thought of yet!
Want to help out? See the source code on GitHub.
10 thoughts on “Shakespeare Serif - an experimental font based on the First Folio”
@Edent I love older fonts (IM Fell is one of the fonts used on my site) and this is fantastic.
Also, with your post you’ve given me the tools to jump-start a font recreation project I’ve had in mind for a bit, so thank you!
| Reply to original comment on mastodon.social
@Edent My heart! This is stunning.
| Reply to original comment on zirk.us
@Edent Such an amazing project. Makes me wish I was still teaching typography to community college students (without making the 90 mile drive to campus).
| Reply to original comment on mastodon.social
@edent
Further discussion on Lemmy - https://beehaw.org/post/6867184
@Edent Can't figure out how to comment on Lemmy, but--have you ever encountered the Print & Probability project by @mdlincoln and others? They have, if I understand correctly, some kind of API for accessing individual characters in 17th century English books that might interesting to use here. https://printprobdb.psc.edu/api/docs/#operation/characters_updatePrint & Probability
| Reply to original comment on sigmoid.social
@Edent I love this! What a cool project.
| Reply to original comment on front-end.social
Rockwalrus
You can have several variants of a glyph in a Unicode font and have them display semi-randomly. See this link for several examples: https://opentypecookbook.com/common-techniques/ (search for randomization.)
@Edent My first thought was, surely someone must have… And I was really surprised that no one seems to have. Nice job!
| Reply to original comment on mstdn.social
@Edent This is amazing!
| Reply to original comment on mastodon.scot
I’ve built a new font! Thoughts and feedback on my approach very welcome.
| Reply to original comment on beehaw.org
More comments on Mastodon.