Success at 2D Printing a Bookcase Mosaic!
Yesterday, I revealed my disappointment in being unable to print a bookcase. Today I revel in my cleverness at coming up with a solution!
I decided to create a photo-mosaic of a nice photo of me and my wife - using all our book covers.
The Result

Close Up
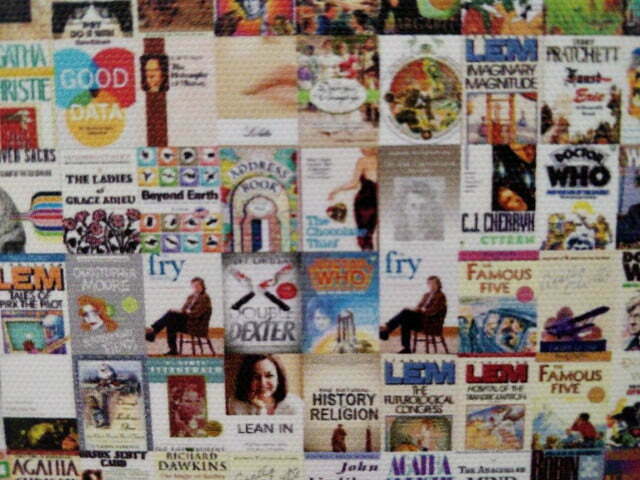
The image was printed on high-quality canvas - which gives it a pleasing texture and isn't too glossy. Zoomed in, this is what it looks like:  As you can see, there is a fair amount of detail on the canvas. Enough so that most titles and authors are legible.
Method
So, here's how to make something like this:
Pick a nice photo
Duh! We chose a selfie my wife took on our road-trip across New Zealand. A happy memory where we both look pretty good, and there's not too much detail in the background.
Get your mosaic tiles
I use Calibre to manage all our eBooks. Run this script to grab all the book covers, and copy them to a directory. All the covers are named cover.jpg - so this renames them sequentially
BASH
#!/bin/bash
OUTDIR=~/bookmosaic/
i=0
find /home/whatever/Calibre\ Library -name *.jpg |
while read FILE; do
OUTFILE="$i.jpg"
cp -p "$FILE" "$OUTDIR$OUTFILE"
((i++))
done
Trim the covers
In order to remove any excess whitespace around the covers, I used ImageMagick's trim command
mogrify -bordercolor white -border 10x10 +repage -fuzz 20% -trim +repage *.jpgThat adds a small white border, then trims it and any other white-ish colours. Without that, it will trim the base colour of the image.
Prune your covers
I ended up with about 3,000 book covers. Hey, we read a lot! But some of the covers were pretty low resolution, some looked crap, and some were from books we didn't want on our walls.
So we flipped through each one and deleted anything that wasn't right for us. A tedious and manual process.
Mosaic Time
There are lots of mosaic programs for Linux. Sadly most seem to be abandoned. I ended up using ImageMosaicWall because it was fairly modern and had a relatively simple GUI

Not the most polished interface, but simple enough to use. Select the image you want to turn into a mosaic, select a folder full of images, fiddle with the resolution and off you go. Even on my modest laptop it took less than a minute to crunch through the images and create the final result.
Resolution
There are two parts to the resolution question - what size will this be printed, and how many columns / rows do you want?
We picked a 75cm x 100cm canvas. According to Photobox, they print at 200dpi so require a 6,000px x 8,000px image.
Next, how many covers are needed to make an image which is recognisable? At 75 covers wide and 75 covers high, the resultant mosaic looked pretty good from a distance. But each book cover would have been a centimetre wide - which would have made most of them unrecognisable. At, say, 50 by 50 the book covers would have been much clearer - but at the expense of the overall image coherence.
I settled on 64x64. That gave a good balance between individual covers and making the photo recognisable.
Variations and Limitations
642 = 4,096 tiles. But I only have about 2,500 covers. That means, inevitably, some will be repeated. The default setting of ImageMosaicWall doesn't have any variation. Which means that the same cover can be repeated multiple times - especially on similar colours like the sky. Here's what it looks like:

Eurgh!
I played around with the variation setting to find a good balance of non-repeating books and overall image legibility. It worked pretty well but there are still a few instances where a book is found in close proximity to itself: 
There are different mosaic tools which allow you to set how often an image is reused.
Another thing to note is that the original cover images all have different aspect ratios. This means the algorithm applies some cropping - mostly, it seems, to the bottom:

Print It!
As mentioned, I used Photobox. They were running a promotion so the canvas, hanging kit, and delivery came to about £60. I'll be honest, that's a bit more than I wanted to spend - but they were recommended to me and were the only printer I could find who would print at 200dpi.
I uploaded the 96MB image, picked my settings, and typed in my credit card details.
A few days after uploading, it arrived - and was hung in pride of place.
Lessons learned
A few things that I wish I'd done differently, or that I may do if I try this again:
- Do a test print. I was over-eager to try this out so I paid £60 for the full thing. I should have paid a tenner for a much smaller test to see if the resolution was good enough.
- Get higher quality covers. Some of my eBooks didn't have great covers. I should have spent time making sure that they were all at the highest resolution possible.
- Get more covers. The 2,500 covers weren't sufficient to provide the most detail and there was quite a lot of repetition. I should have added more - perhaps including video game covers and album covers.
- Be more selective. If I look closely, there are a few books on there which I'm not overly happy about being on display. Nothing too disgusting, just things which have fallen far out of fashion. I should have spent more time pruning the list.
- Normalise the size of the covers. Because they were all different aspect ratios, some have been cropped quite severely. I should have used ImageMagick to extend the edges of any book which didn't have a ratio of 3:4.
- Use a full-bleed print. Mine stops just after the side, which leaves a bit of a white edge. That's mostly a limitation of my original photo though.
- Tweak the algorithm to set a minimum distance between identical covers.
But, perfect is the enemy of done. I'm pleased enough with the print. It isn't perfect - but I actually saw something though from idea to creation. And now we have something on our wall which is personal, meaningful, and co-created.
And isn't a bloody "Live Laugh Love" stencil!
 Playing with Midjourney - art for non-artists
 What if civilisation *doesn't* collapse?
Success at 2D Printing a Bookcase Mosaic! by @edent
I really like this: a personal photo, made up of tiles of covers of their favourite books.
Such a shame that one must accept the risk of copyright infringement for this personal project. shkspr.mobi/blog/2022/04/s…