Easy guide to building Mastodon bots


Twitter is dead! Long live Mastodon!

I've written lots of 'bots for Twitter - and been part of their developer outreach programme. Lots of us have politely requested improvements to the bot experience on Twitter, but to no avail.

So, today I'm going to show you how to quickly and easily write your first Mastodon-bot.

Bots In Spaaaaaaace

Step 1 - you need to set up a new account for your bot. Create it on https://BotsIn.Space/ - a Mastodon instance specifically for robots.

Set it up just like a regular account. Give it a name, an avatar image, and a description. As you edit the profile, be sure to tick the box marked "This is a bot account".
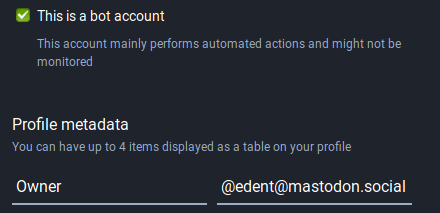
Bio set up page.

Like Twitter, there's no way to officially link a bot to its owner. I suggest using the profile metadata to say who you are. But that's optional.

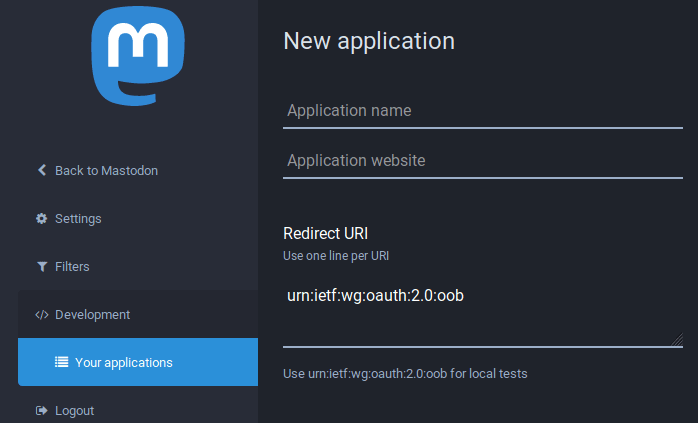
Step 2 - create an application. Unlike Twitter, you don't have to sign up for a development programme. Nor do you have to verify yourself with a phone number. Just go to preferences and click Development - it should take you to https://botsin.space/settings/applications

You need to set an application name - that's it. You can ignore all the other fields. By default your bot can read and write its own timeline. New application page. Hit save when you're done.
Click on the name of your application - and you'll see some long alphanumeric strings. These are your secret tokens. API keys. Do not share these with anyone. Don't take screenshots of them and post them online.
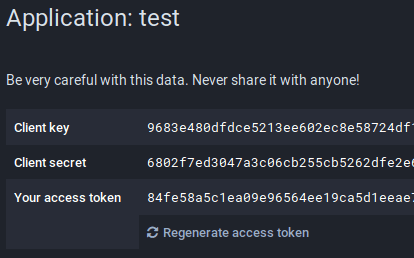
You're going to need "Your access token" for the next stage.

Python

I'm going to assume you're using Python 3. These instructions will work on Linux. You may need to adjust this depending on your software.

Step 3 - we're going to use the Mastodon.py library.

On the commandline, run:

pip3 install Mastodon.py

After a few moments, your library will be installed.

Step 4 - create a new file called token.secret In this file, paste the long alphanumeric string from "Your access token". Make sure you don't have a space at the start or end of the string. Save the file.

Step 5 - create a new file called bot.py Paste the following into the file:

Python 3 Python 3from mastodon import Mastodon

#   Set up Mastodon
mastodon = Mastodon(
    access_token = 'token.secret',
    api_base_url = 'https://botsin.space/'
)

mastodon.status_post("hello world!")

Step 6 - run the file using

python3 bot.py

You bot will "toot" - that is, post a message on Mastodon.

If all you want to do is automagically toot something - that's it. You're done. Shouldn't take you longer than 5 minutes.

Images

You can post up to 4 images on Mastodon.

Assuming you have the image save as test.png here's the code you need:

Python 3 Python 3media = mastodon.media_post("test.png", description="Some alt text.")
mastodon.status_post("What a great image!", media_ids=media)

Want to upload multiple images?

Python 3 Python 3media1 = mastodon.media_post("1.jpg", description="A photo of a lovely horse.")
media2 = mastodon.media_post("2.png", description="A diagram of a starship's warp core.")
media3 = mastodon.media_post("3.jpg", description="A drawing .")
media4 = mastodon.media_post("4.gif", description="An animation of a dancing polar bear.")
mastodon.status_post("Lots of photos.", media_ids=[media1,media2,media3,media4])

There we go, nice and easy!

Demo!

You can follow my Colours bot

What about...?

This is just a basic guide to getting your bot to post to Mastodon. If there's interest, I'll write about other topics.


Share this post on…

  • Mastodon
  • Facebook
  • LinkedIn
  • BlueSky
  • Threads
  • Reddit
  • HackerNews
  • Lobsters
  • WhatsApp
  • Telegram

22 thoughts on “Easy guide to building Mastodon bots”

  1. Rebekah says:

    Thank you. I have been trying to learn about Mastodon bots. Your bot is the first one that has worked as described.

    Reply
  2. kal says:

    Hello! I've never done any coding before but I guess this is how I start. Thank you for the guide! I'm gonna be playing around in Python for a while now I guess haha

    Reply
  3. DJ Adams says:

    Thanks, great little tutorial, I was up and got to Hello, world! in no time.

    Reply
    1. @edent says:

      Hi Mike, I've updated the tutorial. You need to pass description="Your Alt Text." when uploading.

      Reply

Trackbacks and Pingbacks

  1. […] Frühstück, Schwimmen, die Kinder spielen im Garten, Wespen!!, Ostseebot tootet, Ostseebot2 ebenfalls (ist Python nicht was feines?), Schwimmen, Feuer am Strand mit Stockbrot und […]

  2. A spotted dove family decide to move into the windowsill area attached to my room, so I decided to put them on the internet.

    I’d always wanted to make a webcam livestream, but never got around to it. In the span of a few days, I went from zero, to:

    Self-hosted livestream with motionPython program to automatically post to Mastodonffmpeg streaming to YouTube and exposing an RTMP endpoint for other services to consume

    This is how I did it.

    Webcam

    Didn’t want to spend a lot of money, as I wasn’t sure this was going to work, and maybe the thing would be outside. I knew that whatever I got needed to work with Linux, so I was hoping to find some Logitech thing. Unfortunately, when I got to my local 3C store, I found their selection of Logitech webcams to be quite expensive (US$50+). Their cheapest webcam on the shelf was this model, the E-books W16. I did some research in the store, and couldn’t confirm Linux compatibility. I explained my requirements to a helpful sales associate there, he said if it doesn’t work, and I keep everything together, I could bring it back. Cool.

    So I brought it home, connected it to my Raspberry Pi to test and:

    Me, happy

    Success! Native support in Linux. I was happy.

    Mounting

    Conveniently, they decided to build next to where I build

    velcro ftw

    Proxmox

    I wanted whatever server I was going to run to run in my Kubernetes cluster. This meant that I needed to attach the webcam to the VM running my Kubernetes node. Fortunately this was very easy to do in Proxmox, just add it like any other hardware:

    motion + Python mastodon bot

    I’m very new to streaming stuff online. Early in my research, I came across https://motion-project.github.io/. Motion makes it super simple to put webcam video on the internet. It hosts a little webpage and it works well. It has all kinds of other advanced features, including motion detection, and creating time-lapse videos. I hope to play with it more, but initially, my first use was to create a simple stream, which I did quite quickly inside of Kubernetes. By default, motion will automatically look for your webcam at /dev/video0.

    pigeoncam

    The next thing I wanted to do was to create a bot, to periodically post a picture to my Mastodon instance (inspired by Koopa). I configured motion to take a picture every hour, and run a program to ‘toot’ the picture to when it does. This was very easy to do. Actually, I rolled this up into a Docker image: https://hub.docker.com/r/travnewmatic/motion-mastodon-bot (I need to add more documentation, I know). It’s not visible in this Deployment manifest, but if motion needs access to /dev/video0, the pod needs to run with securityContext privileged, and make sure it runs on the node with the USB camera attached (I did this with ‘nodeName‘).

    apiVersion: apps/v1 kind: Deployment metadata: labels: app: motion-mastodon-bot name: motion-mastodon-bot namespace: webcam spec: replicas: 1 selector: matchLabels: app: motion-mastodon-bot template: metadata: labels: app: motion-mastodon-bot spec: containers: - image: travnewmatic/motion-mastodon-bot:rtmp env: - name: instance value: "https://nangang.travnewmatic.com" - name: token value: "xxxxxxxxx" - name: message value: "我們是板橋的鴿子! 歡迎來到台灣! Watch us live! https://youtu.be/837ybwe5LJA #pigeon" imagePullPolicy: Always name: motion-mastodon-bot volumeMounts: - mountPath: /var/lib/motion name: snapshots ports: - containerPort: 8080 name: control protocol: TCP - containerPort: 8081 name: stream protocol: TCP volumes: - name: snapshots emptyDir: {}

    travnewmatic/motion-mastodon-bot takes a few environment variables:

    the URL of the Mastodon instance you want to post tothe token of your accountthe message you want to include with the picture(optionally) the snapshot_interval, which is set to 3600 seconds by default

    The tooting part was super simple:

    #!/usr/bin/python3

    from mastodon import Mastodon import os

    token = os.getenv('token') instance = os.getenv('instance') message = os.getenv('message')

    Set up Mastodon

    mastodon = Mastodon( access_token = token, api_base_url = instance )

    media = mastodon.media_post("/var/lib/motion/lastsnap.jpg", mime_type="image/jpeg") mastodon.status_post(message, media_ids=media)

    One nice thing motion does: in the snapshot directory, it maintains a symlink ‘lastsnap.jpg’ pointing to the most recent snapshot. Pretty neat 🙂

    ffmpeg

    Pretty quickly, I ran into a problem. I could only have one thing using /dev/video0 at a time. This was not ideal. So after A LOT of experimentation, I came up with this:

    ffmpeg -i /dev/video0 -f flv -rtmp_live live -listen 2 rtmp://:1935

    Looks pretty simple now, but:

    i’m an idiotffmpeg is hard

    This little bit was enough to expose /dev/video0 for other services to consume. So, I made a slightly modified version of my motion container to use this RTMP stream instead of the /dev/video0 device:

    # Full Network Camera URL. Valid Services: http:// ftp:// mjpg:// rtsp:// mjpeg:// file:// rtmp:// netcam_url rtmp://ffmpeg-rtmp.webcam.svc.cluster.local

    That URL looks the way it does because thats how hostnames (can) look inside Kubernetes.

    YouTube

    My functional, albeit choppy, pigeoncam stream was working, and posting to Mastodon was working. But I was a little annoyed that the webcam could do slightly better video than what motion was showing. My first approach was to make another ffmpeg to pull from the first ffmpeg and send to YouTube. I wasn’t having much luck with that. Fortunately, I discovered that ffmpeg can have multiple outputs! In my ffmpeg/youtube research, I came across some discussion about YouTube requiring some audio component of the stream, even if there’s no sound, so I included that in my ffmpeg command:

    ffmpeg -i /dev/video0 -f flv -rtmp_live live -listen 2 rtmp://:1935 -f lavfi -i anullsrc -f flv -rtmp_live live -c:v libx264 rtmp://a.rtmp.youtube.com/live2/supersecretyoutubekey

    Not visible: Me, losing my shit because I managed to get ffmpeg to stream to YouTube

    ffmpeg deployment manifest:

    apiVersion: apps/v1 kind: Deployment metadata: labels: app: ffmpeg-rtmp name: ffmpeg-rtmp namespace: webcam spec: progressDeadlineSeconds: 600 replicas: 1 revisionHistoryLimit: 10 selector: matchLabels: app: ffmpeg-rtmp strategy: rollingUpdate: maxSurge: 25% maxUnavailable: 25% type: RollingUpdate template: metadata: creationTimestamp: null labels: app: ffmpeg-rtmp spec: containers: - command: - ffmpeg - -i - /dev/video0 - -f - flv - -rtmp_live - live - -listen - "2" - rtmp://:1935 - -f - lavfi - -i - anullsrc - -f - flv - -rtmp_live - live - -c:v - libx264 - rtmp://a.rtmp.youtube.com/live2/supersecretyoutubetoken image: jrottenberg/ffmpeg imagePullPolicy: Always name: ffmpeg ports: - containerPort: 1935 name: rtmp protocol: TCP resources: {} securityContext: privileged: true terminationMessagePath: /dev/termination-log terminationMessagePolicy: File volumeMounts: - mountPath: /dev/video0 name: webcam dnsPolicy: ClusterFirst nodeName: k3s1-node1 restartPolicy: Always schedulerName: default-scheduler securityContext: {} terminationGracePeriodSeconds: 30 volumes: - hostPath: path: /dev/video0 type: "" name: webcam

    Conclusion, References

    So that’s where things are right now. I wanted a way to document and share the progress of my new avian neighbors with the world, and I’m quite proud of what I’ve been able to accomplish. Share the stream with your friends!

    Had the magic command to get me going with ffmpeg: https://installfights.blogspot.com/2019/01/webcam-streaming-throught-vlc-with-yuy2.htmlMake a mastodon bot with Python: https://shkspr.mobi/blog/2018/08/easy-guide-to-building-mastodon-bots/Configure motion: https://motion-project.github.io/motion_config.htmlConsume host device with pod: https://stackoverflow.com/a/42716234ffmpeg + youtube + audio: https://superuser.com/a/1537250

  3. Mastodon.py proved to be a very easy way to make a bot in Python that can talk to the federated net, specifically the Mastodon API. With a little push from Terence Eden’s blog (below), I was able to get started quickly.

    Easy guide to building Mastodon bots

    What are we trying to do here? It’s a loaded question. Basically, I use a different-than-Mastodon federated net software called Akkoma for my microblogging needs (find me here: @knova-dartboard-social). For some reason, I cannot subscribe to my WordPress blog feed from Akkoma, but it works fine via a test Mastodon account. What gives? I am still trying to figure that out, but I’m narrowing down on it being a bug in how Akkoma handles follows. Full disclosure – I could be way off, and it might be an issue with the ActivityPub plugin for WordPress – there is more investigation to be done.

    Anyway, I figured if I can see it on a Mastodon account, I should be able to then view the reposts on that Mastodon account and see the original post, right? Bingo:

    Reposting a WordPress blog post from this here website via a bot on Mastodon

    The code for this is available in my Github page, and it also includes a Dockerbuild file so you can turn this into a docker image and then container. I’m still learning a bunch about this, but my next step is to publish it on DockerHub or some other container repository and make it more easily configurable from a command line argument.

    PS: Docker might not be the easiest way to run a simple Python script, but I wanted to learn more about building a container, which I had never done before. I am also going to look into adapting this into an AWS Lambda function or something similar for ease of use.

    What about the bug in Akkoma? The next item on my to do list is to officially report it, but I need to gather more information first. I hope this can be identified and resolved so we can work towards building a better federated internet, without having to rely on one open source project (Mastodon). The more projects that interoperate, the better.

  4. I have long admired albums2hear, a Twitter bot that posts albums. You can read a bit more about it here. There was no mastodon equivalent and so I decided to build one.

    You can follow the bot – currently called Albums Albums Albums (or AlbumsX3) – here.

    Idea behind the bot

    The idea is to periodically post an album. The toot is simple the artist, title and year, include the cover, and… that’s it! People can leave a comment if they love the album, discover something new or whatever. The idea is just to put an album suggestion into people’s feeds so that they might be inspired to hear something new or revisit a classic album.

    I wanted it to post albums that I would recommend. So this is where the build starts…

    Use R to make a list of recommended albums

    I have a method for importing my iTunes/Music library as XML into R (I plan to write this up in the future). From this import, I reasoned that I can grab the albums where I have listened to it more than once and that will do as a recommendation. There were about 1.4K albums with mean plays greater than 1. I filtered out singles, EPs, compilations, various artists, bootlegs, ROIO and unofficial stuff. This left me with a list of about 1K albums, in a data frame called album.

    From here, making a data frame of Artist, Album and Year is easy, but I also needed to get the album artwork. I used the following to find the location of the first track from each album on my server, and then create a unique/safe name for each image file.

    get a list of files, one from each album. We'll take the first.

    first_file <- cbind(album, filepath = album_tracks[match(album$Key, album_tracks$Key),"Location"])

    in the data frame filepath has %20s etc.

    library(urltools)

    change the url/uri of filepath into a real filepath

    file_list <- url_decode(first_file$filepath)

    remove the preceding file:// to leave /share/name/path

    file_list <- gsub("file://","",file_list)

    append column to data frame

    first_file$file_list <- file_list

    for the name of the image that we will extract from the first file, we need to use a safe name

    Key is a paste of artist and album. It will be unique but let's make safe for command line.

    makeSafeFileName <- function(x) { y <- gsub("[[:alpha:]]","",x) strlen <- nchar(y) if(strlen > 0) { for(i in 1:strlen) { chrToReplace <- substr(y,i,i) x <- sub(chrToReplace,"",x, fixed = TRUE) } } # very long strings should be truncated if(nchar(x) > 28) { x <- substr(x,1,28) } return(paste0(x,".jpg")) }

    first_file$img_name <- sapply(X = first_file$Key,FUN = makeSafeFileName)

    img_df <- data.frame(file_list = file_list, img_name = first_file$img_name)

    write data to file - we will use this to extract the artwork

    write.csv(img_df,"Output/Data/filelist.txt", row.names = F)

    Now I had a list of one track from each album and a corresponding image file name. I also made a csv for the bot to be used to compose the toots.

    now make data frame for bot

    bot_df <- data.frame(artist = first_file$TheArtist, album = first_file$Album, year = first_file$Year, img_name = first_file$img_name) write.csv(bot_df,"Output/Data/bot_df.csv", row.names = F)

    Extracting the artwork

    All of my music files have the artwork embedded and it is possible to retrieve this using ffmpeg. However, my shell scripting game is a bit weak, so I simply edited the filelist.txt file so that each pair of file_list and img_name became the two arguments in:

    ffmpeg -i input.mp3 -map 0:1 output.jpg

    and processed the whole thing as a huge multiline command.

    Now I had bot_df.csv and a folder full of images. Time to build the bot!

    Setting up a Mastodon bot

    There’s a great, simple guide by Terence Eden which I followed. It’s from 2018 but still works as described. Briefly, I signed up for a botsin.space account and set up an app. The account approval took a few days (it was the weekend) but otherwise this was straightforward. I generated some artwork for the banner and avatar and was ready to start posting.

    Python script for posting

    The csv of the data frame and this script are in a directory, with a subdirectory called img

    Below is the script (modified to remove the token) I am using. It selects a random row to post. This means that duplicate posts will happen, but I didn’t try too hard to find a way around this. I might revisit it in the future. Each time it reads in the data frame. Again, I couldn’t think of a better way to do this. The bot takes about 4 s to generate a post, but that fine with only 4 posts a day.

    import pandas as pd from mastodon import Mastodon import os

    relative path of data

    dfFile = os.path.realpath(os.path.join(os.path.dirname(file), '..', 'bot_df.csv'))

    import the data into data frame

    df = pd.read_csv(dfFile, sep=",")

    select a random row of data frame

    theRow = df.sample()

    build the text string - this will be the message in the post.

    textString = " - ".join([theRow['artist'].loc[theRow.index[0]], theRow['album'].loc[theRow.index[0]], str(theRow['year'].loc[theRow.index[0]])])

    add hashtags

    textString = textString + "n#Music #AlbumSuggestions #NowPlaying"

    build image path

    imgPath = os.path.realpath(os.path.join(os.path.dirname(file), 'img', theRow['img_name'].loc[theRow.index[0]]))

    write apologetic alt text

    altText = "The image shows the album cover. Sorry for lack of a better description; I am just a bot!"

    Set up Mastodon

    mastodon = Mastodon( access_token = 'foobar', api_base_url = 'https://botsin.space/' )

    media = mastodon.media_post(imgPath, "image/jpeg", description=altText) mastodon.status_post(textString, media_ids=media)

    And that’s it! I tested the bot would work using my mac, but ultimately it is running on a Raspberry Pi zero that also doubles up as a weather station.

    Move everything to the Pi

    I zipped everything and, using SFTP, copied it over to the Pi and extracted it on the other side. I ran the script to check that it posted to Mastodon and all was good.

    I am using cron to trigger the python script to generate a post. I am posting at 4 times during the (UK) day, so it was a straightforward matter of adding four lines to crontab. My initial tests of the bot, triggering it from the command line all worked fine; on macand on the Pi. While they were working, my first version of the script used relative paths. When running from cron, the script failed. This was fixable by making the script more robust (this is the os command stuff in the script). If you are struggling at this step I advise triggering the script from the root directory using the long path to the script and troubleshoot from there.

    Room for improvement

    I am not using image descriptions for the album covers, which I am not happy about.

    If the power is cut, the bot comes back to life on a restart, but it is possible that the Pi can crash or lose internet access. I don’t have a good solution here. My current setup is to a) follow the account on my main mastodon account (it is possible to set a notification when an account posts something too) and b) follow it as an rss feed in feedly. I figure that I will notice one of these methods if it stops posting.

    I don’t currently have anything setup to deal with people replying to it or messaging the bot. There are a few automated methods out there but I haven’t yet explored any.

    The post title comes from the album “Probot” by Probot. It’s a Dave-Grohl-plus-guests heavy metal side project which features some great tunes. Share this:Click to share on Twitter (Opens in new window)Click to share on Facebook (Opens in new window)Like this:Like Loading...

    <em>Related</em>

What links here from around this blog?

What are your reckons?

All comments are moderated and may not be published immediately. Your email address will not be published.

Allowed HTML: <a href="" title=""> <abbr title=""> <acronym title=""> <b> <blockquote cite=""> <cite> <code> <del datetime=""> <em> <i> <q cite=""> <s> <strike> <strong> <p> <pre> <br> <img src="" alt="" title="" srcset="">