Raspberry Pi Zero Hidden In An Xbox Controller
By @edent![]() · hack hacks hardware NaBloPoMo Raspberry Pi xbox · 45 comments · 150 words · read ~115,210 times.
· hack hacks hardware NaBloPoMo Raspberry Pi xbox · 45 comments · 150 words · read ~115,210 times.
I like to tinker. My wife picked me up the new Raspberry Pi Zero. It's an ultra small and ridiculously cheap computer. How small and cheap? They give it away free on the cover of magazines...
In related news, @summerbeth is the best wife of them all! #PiZero pic.twitter.com/utsF2m13jo
— Terence Eden is on Mastodon (@edent) November 27, 2015
Ok, so what can I do with a wafer-thin Linux box? I had thought of turning it into a simple door sensor, or perhaps wiring it in to a lightswitch, or swallowing it to see if I would get super powers. Then it struck me - turn it into a games console!
Now, don't get me wrong, this has been done many times before - but I think I've come up with a unique twist. Build it directly into the controller!
My original plan was to buy some USB NES controllers - they're about the right size, but with only two buttons I'd be restricted to playing, well, old NES games. Also, buying new plastic stuff... nah! Reduce, Reuse, Recycle!
Long term readers will remember that I turned my original Xbox into a Linux running media centre. I still have the original (giant) controllers, my brilliant wife suggested that there was probably enough space in one to fit the Pi Zero.
Right, time to load an OS into my games controller ☺ pic.twitter.com/xqyuP3I3dm
— Terence Eden is on Mastodon (@edent) November 29, 2015
Let's Go!
Getting Started
WARNING! Playing around with electric items can be dangerous. You risk damaging yourself or, worse, breaking your toys. Proceed with caution.
Equipment
- Raspberry Pi Zero (£5).
- Original large-sized Xbox Controller (£variable).
- USB OTG cable (65p).
- 2A USB power supply (£5).
- Mini HDMI adapter (80p) or Mini HDMI cable (£5).
- MicroSD card (£5).
- The usual assortment of screwdrivers, knives, wire-strippers, and nerves of steel!
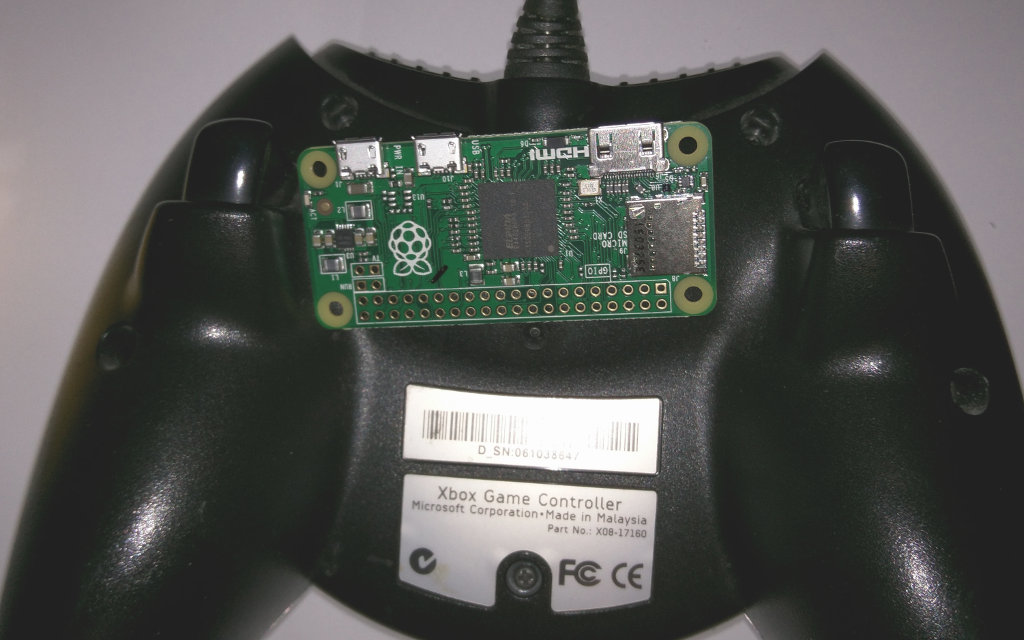
Right, remember this big brute?

The Pi nestles neatly between the triggers, so it should fit.
Open it up:
I removed the chunky memory card holder. I left in the physical slots as a wedge to hold the Pi.
After unscrewing all the cross-head screws, we can see how well it fits.
Nifty!
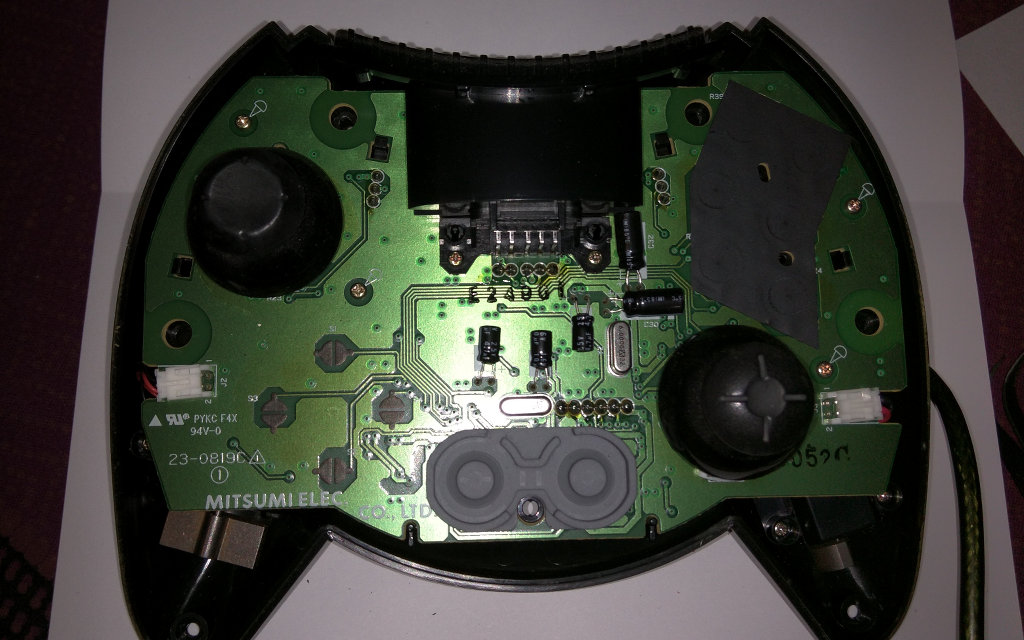
Ah, but can you spot the problem?

The Pi is blocking that strut. Only one thing to do...

The plastic was soft enough that a penknife made short work of this.
As you can see, the inside of the controller has lots of room.

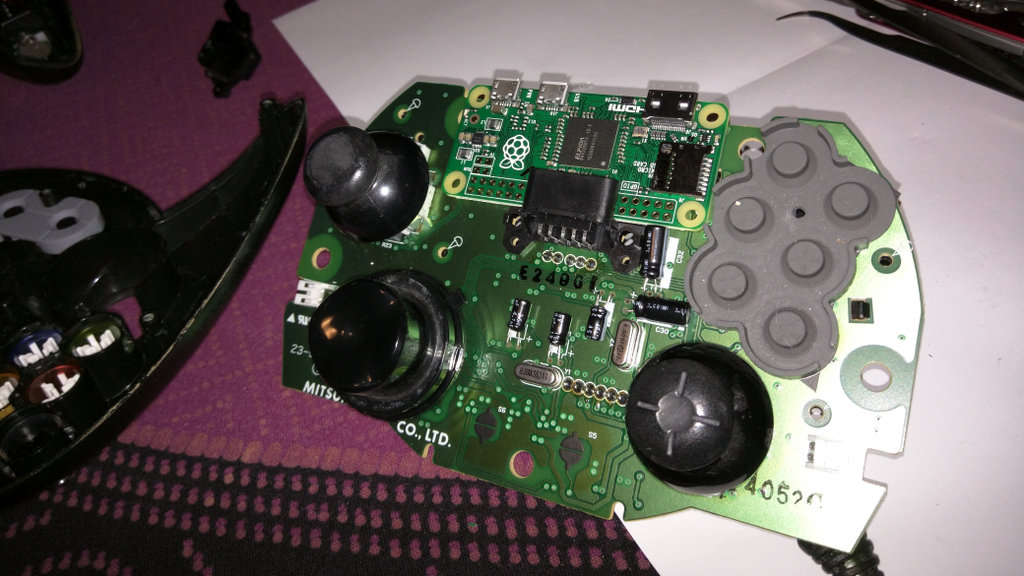
In order to connect the controller to the Pi, we need to do some wire stripping. The Xbox controller uses bog-standard USB wiring, but has a proprietary plug. So, chop the ends of that and wire it into a USB OTG cable.


I suppose I could have just wired in a regular USB plug, or bought an Xbox USB adapter. But where's the fun in that?
One thing to note, you'll need to insulate the bottom of the Pi against all the contacts on the controller. For this quick hack, I'm using some of the cardboard packaging.

Not exactly sustainable from a long term POV! Nor is the BluTak used to hold everything into place.
So, the controller's cable loops back into itself and plugs into the Pi. The Pi takes in power and outputs over HDMI.

It would have been great if HDMI also supplied the power - but I don't think that's possible. There is enough space inside the controller for a USB battery pack should you want a more portable solution.
And... errr... that's it really!
Emulation
The good folks at RetroPie have a pre-built image which contains everything you need in order to run a variety of emulators. It even includes some built in shareware games.
We want the build for the Raspberry Pi version 1. It automagically detected the Xbox controller, and after a few clicks I was playing Doom!
OMG! I'VE ONLY GONE AND BLOODY DONE IT!#PiZero hidden in an Xbox controller playing DOOM!https://t.co/jF3dgoKO3y pic.twitter.com/b9IrxoKxG7
— Terence Eden is on Mastodon (@edent) November 29, 2015
The Raspberry Pi Zero is, without exaggeration, a marvel.
When I was a kid, computers were unreasonably expensive. I remember reading this passage from The Demon Headmaster series of books:

I felt so angry that the computer revolution was restricted to those whose parents or schools could afford such luxuries. The Pi is (almost) cheap enough to give away with cornflakes. Sure, the sundry items cost a little bit more - but this puts powerful computers within the reach of everyone.
The size is also... It's almost too small! If you lose one in your home, it's probably cheaper to buy another than waste an hour looking for it. That also means it can sneak into unexpected places - I can see kids hiding these in games controllers, hair brushes, or flick knives. Add a battery pack and a mesh-networking module and you've got a communications infrastructure that a school cannot censor.
Interesting times ahead!
Update! Well, that went better than expected. You can read what people have to say about the project at:
- Hacker News
- Heise (German)
- der Standard (Geman)
- Make Magazine
- Zona IT (Romanian)
- Geek Times (Russian)
- Hackaday
- LifeHacker
- Xatak (Spanish)
- IT Pro
- Wired
Mini-bot had great fun playing on @edent's hacked Xbox @Raspberry_Pi #PiZero with @LinuxUserMag #PiParty pic.twitter.com/zZmCFnSueW
— David Bower (@rddave) March 5, 2016


 Smart Lights - Dumb Decisions
 Technology Preview - The ReSpeaker
 Building an Internet Connected Fridge
I definitely the idea of a "flick pi" remove the knife blade from a large flick knife and replace it with a Pi Zero
Awesome article, you are so Lucky here in Spain not available and I wanted to get one but nothing
I have seen people direct solder Wi-Fi dongles using the back pins on the Zero, maybe you try that straight from the controller so you can eliminate an unneeded cable. PP1 and PP6 for power and then PP22 and PP23 for data are what you are looking for.
Good plan! Might need to practice with the soldering iron ☺
I haven't played too much with RetroPie, but maybe with that freed up port ypu can add second player with another controller.
You say that you don't think it's possible to power the board through HDMI.. Isn't it what chromecast or pc sticks are doing ?
The Chromecast has a micro-USB slot for power - so do most Android TV sticks.
https://support.google.com/chromecast/answer/2998341?hl=en-GB
Thanks for the answer. I didn't realise ...
Very good post. I should have started by that 🙂
Chromecast has a mini-USB port on it that plugs into an outlet to supply the power.
Jose - Get it from abroad, shipping cost is negligible today (if they dont offer shipping to Spain, use shipito or the likes).
The most awesome STEM birthday party take home gift ever!
very good job,
i would like to build one mysalfe with an extra twist.
+add wifi option
+add built in USB battery pack
+broadcast via chrome cast to the tv
do you think it will work?
thanks
It's an interesting idea. I'm not sure if you'll be able to fit many batteries in there - I also don't know how you stream to a Chromecast. Can't wait to see if you do it 🙂
you know that those memory card slots are standard usb and that its a usb hub on the controller? if ou want an extra controller or wifi or something 🙂
That's very true - although they will require an adaptor.
Use some jumper wire and solder it. Even if you don't do that, you should at least solder those wires... 😉
The HDMI spec says it supplies +5V on pin 18 with a minimum capacity of 55ma, which i dont think is enough go juice to power up a Pi Zero. But that is a minimum requirement, most tvs will supply more. However if you try to draw more than that there is a chance of damaging your tv.
It's actually the Pi supplying that voltage. See http://www.hdmi.org/learningcenter/kb.aspx?c=13#42
Those memory card slots are actually usb 1.1 ports. The controller has a built in hub. It would be slow for wifi but just fine for more controllers or a keyboard and mouse.
Great idea and write up! Would soldering the four and five pin on the board allow use of a normal USB cable?
Might do - I'm too much of a chicken to solder 🙂
Thanks! Started my build and might do a write up on it. If I do I will give full credit to you and link to your blog and let you know where its at.
OK, I have a couple of Pi zeros in hand and followed everything up to where you're getting power from if not over HDMI. Controller cable to where, and what is the other white micro cable running to?
Hi Alvin. The white USB cable is just going to a regular power socket. The OTG cable connects to the Xbox controller. The HDMI to your TV. Hope that makes sense 🙂
Got it - "So, the controller's cable loops back into itself and plugs into the Pi. The Pi takes in power and outputs over HDMI." threw me - "loops back on itself" - so this could be cleaned up quite a bit on that cable with a bit of effort.
FYI, you may have seen something like this already - this is a crappy video, but basically this. The controller itself is just plastic and can be "dyed" easily using "vinyl dye" available in rattle can in any auto parts store. I prefer the SEM brand, but duplicolor seems more available. Basically pull it down to bare plastic, clean everything with alcohol, let dry, then do very light passes. This is not paint, but actually seeps into the plastic, so it's permanent. with stencils/whatever, you can do cammo, retro 8 bit graphics, whatever.
http://i5.walmartimages.com/dfw/dce07b8c-56bf/k2-_9558ddfc-feb4-4973-bf51-dfd5e2e73836.v1.jpg
Hey, we're there any special drivers required on the pi end of things? Or is it just plug and play?
Just plug & play. I think the USB drivers are part of RetroPi.
Way too cool, gonna give this a go, kudos for sharing.
Can this be done using a 360 wired controller?
Try it and let us know 🙂
I took your idea and turned it up to 11:
http://www.instructables.com/id/RetroPi-Xbox-Controller/
Hi Terence,
I tried all the steps you said but when I power up I get the "no hdmi signal"
Any ideas?
I suggest unplugging everything and seeing if you can boot it up normally. Just an SD card, power, and HDMI.
How long did it take for this to be made? How many times did you have to do this before it started working the right way,when that didn't what did you do to try it another way?
Hi Bri,
It took a couple of hours from start to finish. You can probably check exactly how long by checking the time of my tweets.
It worked straight away. I was a little worried about the wiring - but luckily it wasn't a problem.
All the best,
T
Ok cause I'm doing a project in my class and I have to write a powerpoint about how project's work and I was using this for an example on how project's work, and how long it took until it was working, and did you have to try a bunch of times?
What do you think can you help me with that?
Hi Bri,
I'm not sure how schools in Kansas work - perhaps it would be better if you tried this project for yourself?
Anyway, if you read my previous reply, you should find the answers to your questions.
Ok thanks for your help..
Hey I need help I'm in 12th grade and at my school we are having a science fair and I like this project I'm going to use this for my examples because I have to write a paper on all of the examples I can find about how project's work and I like this one so I need help on, how long it took for you to do this project? and did it work the first time you tried it?
Hello there,
Thanks for the inspiration. I know this post is old but i would like to say job well done. After days of searching trying to find a one of a kind case to put a pi in i decided i liked your idea the best but i put my own twist on it. I used a pi 3 slimmed down and put it inside an xbox one controller. Unfortunately the controller doesnt have the same space inside so the controller had to be gutted. But do to the pi3 having wifi and bluetooth i opted for a console theme where i use a wireless xbox one controller with it.